The Final Tally.
For the required four layers I have entered:
Layer 1--A Men's Smock, handsewn, meets Hand Sewn Under Garment requirement
Layer 2--A Men's Trousers, handsewn
A Men's Tunic, handsewn
Layer 3--A Men's Cloak, handsewn
Accessory--A Viking Hat
Extra Accessories:
1--Leather Tooled Axe Sheath
2--Amber and Glass Bead Necklace
3--Viking Leather Pouch
4--Pewter Brooch
5--Carved Drinking Horn
6--Unlevened Barley Buns
and
1--Leather Tooled Belt, Unfinished
Grand Categories and Sub-Categories:
1) Carving Non Wood-Horn, CA-H--Carved Drinking Horn
2) Carving Non Wood-Bone, CA-B--Toggles
3) Carving Non Wood-Stone, CA-S--Mold for Pewter Cast
4) Cooking-Baking, CO-B--Unlevened Barley Buns
5) Costuming-Accessory,C-AC--Viking Hat, Leather Tooled Axe Sheath, Amber and Glass Bead Necklace, Viking Leather Pouch, Pewter Brooch, Carved Drinking Horn, Leather Tooled Belt
6) Costuming, Court Pre 1000, C-CO1--Men's Tunic, Men's Cloak
7) Glass-Other,G-O--Glass Beads
8) Heraldic Display-Garment, HD-G--Embroidered Devices on Tunic
9) Jewelry-Strung Jewelry, J-ST--Amber and Glass Bead Necklace
10) Leatherworking-Decorative, LE-D--Leather Tooled Axe Sheath, Leather Tooled Belt
11) Leatherworking-Functional, LE-F--Viking Hat, Viking Leather Pouch, Leather Tooled Axe Sheath, Leather Tooled Belt
12) Metalworking-Decorative, ME-D--Metal Rim on Drinking Horn
13) Metalworking-Casting, ME-C--Pewter Brooch
14) Metalworking-Raised Work, ME-R--Metal Rim on Drinking Horn
15) Metalworking-Cold Fabrication, ME-CF--Wire Netting on Amber Necklace, Metal Rim on Drinking Horn
16) Metalworking-Repousse, ME-RP--Metal Rim on Drinking Horn
17) Needlework-Applique, N-A--Tablet Weave on Men's Tunic
18) Needlework-Surface Embroidery,N-SE--Embroidery on Men's Tunic, Embroidery on Cloak
19) Textile Arts-Application, TA-A--Lucet Cord
20) Textile Arts-Woven,TA-W--Tablet Weave on Men's Tunic, Tablet Weave on Viking Hat
21) Textile Arts-Non Woven, TA-NW--Felted Wool on Viking Hat
Saturday, December 31, 2011
Leather Belt
You see it in every picture of medieval age replicas. In movies. On the History Channel. In museums and in paintings. In articles dicussing 1000 year old digs and finds. At SCA events.
It has always been around. It always will be. In some cultures, it holds up the pants. In most cultures, it is there to hold the sword, the pouch, the drinking horn. It is a place for a working lady to tuck the hem of her skirt to keep it out of the coals while cooking. It is versatile. It sometimes is colorful. In the SCA it has an extra meaning by what color it is--knights wear white, apprectices wear green, protegees yellow, and squires wear red. It can be made out of cloth, tablet or inkle weaves, rope, leather; whatever one has handy. It can have a buckle. In can have a simple "O" ring. Or no buckle or ring at all and is simply tied on.
The belt.
For my last entry into the ACC I have chosen to make a leather belt for Padruig to complete this Mammen Man replica I have created. I have made it using the same natural toned, undied leather that the axe sheath was made from, using the same chocolate brown lacing as the axe sheath and the same Double Loop edge weave. I opted to use the same theme to make it all mesh together, blending the tones to tie all items as one unit.
I did add celtic knot leather stamps so they are evenly spaced up the part of the belt that hangs down in the front. They do not continue around Padruig's torso. I chose to use a small "O" ring as the buckle.
 The lacing being used to attach the "O" ring, instead of metal rivets.
 The edging of the belt, worked in the Double Loop method.
 Flat side view of the Double Loop method.
 The pointed celtic knot stamp at the front tip of the belt.
 The square celtic knot stamp that is spaced down the front of the belt.
This belt is an unfinished project for the ACC. The finished belt will have metal decorative conchos spaced between the celtic knot squares along the front of the belt. I plan to have it completed for 12th Night Investiture.
It has always been around. It always will be. In some cultures, it holds up the pants. In most cultures, it is there to hold the sword, the pouch, the drinking horn. It is a place for a working lady to tuck the hem of her skirt to keep it out of the coals while cooking. It is versatile. It sometimes is colorful. In the SCA it has an extra meaning by what color it is--knights wear white, apprectices wear green, protegees yellow, and squires wear red. It can be made out of cloth, tablet or inkle weaves, rope, leather; whatever one has handy. It can have a buckle. In can have a simple "O" ring. Or no buckle or ring at all and is simply tied on.
The belt.
For my last entry into the ACC I have chosen to make a leather belt for Padruig to complete this Mammen Man replica I have created. I have made it using the same natural toned, undied leather that the axe sheath was made from, using the same chocolate brown lacing as the axe sheath and the same Double Loop edge weave. I opted to use the same theme to make it all mesh together, blending the tones to tie all items as one unit.
I did add celtic knot leather stamps so they are evenly spaced up the part of the belt that hangs down in the front. They do not continue around Padruig's torso. I chose to use a small "O" ring as the buckle.


This belt is an unfinished project for the ACC. The finished belt will have metal decorative conchos spaced between the celtic knot squares along the front of the belt. I plan to have it completed for 12th Night Investiture.
Unlevened Barley Buns
This recipe was directed to me the other day. It is an article written by my obviously favorite medieval researcher and author, Carolyn Priest-Dorman. The article titled "Viking Barley Bagels: Unlevened Barley Buns" was written after she researched this bread for her 12th Night feast in the East Kingdom in January of 1993. It seems fitting that I should use her rendition of this recipe for our 12th Night celebration and Investiture.
In her research she designed this recipe using an analysis of breads and buns found in 9th and 10th century graves in Birka, Sweden. The shape she uses for this bread, a small bagel shape, came from a Migration Era find, also in Sweden. She adapted the technique and flour proportions with the help of the cookbook "The Tassajara Bread Book" which uses measurements very similar to known Viking measurements.
It is a simple, unlevened bread. In English, that means no yeast or yeast type substance is used. It makes it so the buns do not rise and are dense due to the lack of air in the dough. They are made from whole wheat and barley flour, which adds to the flavor, but also makes for a dense, solid bread. This bread is a meal all in itself, which is why they used it for travelling. Eat a piece of a hearty bun such as this with a chunk of cheese and/or some fruit and there is your travelling meal for mid-day.
I add this to my entries on the basis that Nobleman or not, he was travelling and would need to eat. He simply would reach into his handy dandy leather pouch convieniently hanging from his belt and would pull out a barley bun and eat away.
The recipe is made with simple ingredients that even the poorest and slowest of Vikings would have available to them or could trade for: wheat, barley, salt, oil and hot water.
 I started off by grinding the whole wheat and the barley into flour. I used my hand crank grinder, and while not period, it still was almost an hour of grinding to make the flour for this recipe.
 Then, over low heat, roast the barley flour in some sesame oil until it turns golden brown and smells absolutely delicious. I have never heard of browning ground flour before. The only reason I can think of is the releasing of flavor. It went from "that smells like it may make a tasty bread" to "I cannot wait to eat this bread--it smells so good!" After it is browned, combine it and the wheat flour, salt, more sesame oil and boiling water is all added at once. Carefully, since it is rather HOT, knead it as small chunks first, then larger chunks of dough until all the dough is being mixed by your hands at once.
 Done. They look like ginger snaps, are crunchy like pretzels and are slightly sweet with a yummy nutty flavor. I like this recipe!
In her research she designed this recipe using an analysis of breads and buns found in 9th and 10th century graves in Birka, Sweden. The shape she uses for this bread, a small bagel shape, came from a Migration Era find, also in Sweden. She adapted the technique and flour proportions with the help of the cookbook "The Tassajara Bread Book" which uses measurements very similar to known Viking measurements.
It is a simple, unlevened bread. In English, that means no yeast or yeast type substance is used. It makes it so the buns do not rise and are dense due to the lack of air in the dough. They are made from whole wheat and barley flour, which adds to the flavor, but also makes for a dense, solid bread. This bread is a meal all in itself, which is why they used it for travelling. Eat a piece of a hearty bun such as this with a chunk of cheese and/or some fruit and there is your travelling meal for mid-day.
I add this to my entries on the basis that Nobleman or not, he was travelling and would need to eat. He simply would reach into his handy dandy leather pouch convieniently hanging from his belt and would pull out a barley bun and eat away.
The recipe is made with simple ingredients that even the poorest and slowest of Vikings would have available to them or could trade for: wheat, barley, salt, oil and hot water.

 Then, over low heat, roast the barley flour in some sesame oil until it turns golden brown and smells absolutely delicious. I have never heard of browning ground flour before. The only reason I can think of is the releasing of flavor. It went from "that smells like it may make a tasty bread" to "I cannot wait to eat this bread--it smells so good!" After it is browned, combine it and the wheat flour, salt, more sesame oil and boiling water is all added at once. Carefully, since it is rather HOT, knead it as small chunks first, then larger chunks of dough until all the dough is being mixed by your hands at once.
The incredibly stiff dough is then divided up into 24 portions. Each piece is then rolled into a ball and flattened slightly. I used the handle of a wooden spoon to poke a hole in the center. This bread is so very dense that if the center were not cut out, it would never bake all the way through and would be doughy in the middle. The buns resemble mini-bagels sitting on my pans. They are left to set, covered with a towel, 6-8 hours. They do not rise at all. They then bake for an hour. 


Viking drinking horn
I have always liked the Viking drinking horns, even have had an unfinished horn for over three years, and haven't, until now, ever made a drinking horn. Gotta love this competition.
Drinking horns have been in use from medieval times to modern times. Some horns have bases that are very elaborate, some very simple, that the horn may sit in and not spill. I admit that I have some deer antlers that my intention was to make into a simple drinking horn holder, but I ran out of time. It will be made, just not tonight.
Most horns have a strap or handle that can be looped on a belt so the owner does not lose their horn. The loop or handle does much for keeping the owner in possession of the horn, but there is still the problem of spillage when the horn has liquid in it and a pointy bottom. However, I have been told by several modern day Vikings that a honest to goodness true Viking would never set down his horn with any beverage still in it. :) I am leaving the strap off of my drinking horn for now so I can leave open the option of completing the horn holder I mentioned before and I will see what kind of handle I want to do then.
The carving of the horns can be very breath taking and awe inspiring or they can be very simple and just state "my horn, back off". Here are some examples of what can be done with a drinking horn, some imagination and quite a bit of time.


And some of the more simple designs of horns.


My horn is a pretty black and gray toned, medium sized horn. I wanted to do carving on it and metal work. This was my first attempt at carving on a horn of any sort and my first time working with stamping and shaping metal.
The first thing I did was to carve three of the faces and leaves from the Mammen Man tunic down the long curve of the horn. I carved the faces and leaves using an awl and then a medium weight file to take off the rough spots and smooth everything out. Look at the faces when you get a chance. The whorl of the black and gray make it look like it has a mouth and it howling. Rather neat looking I think.

I used bees' wax to waterproof and finish the inside of the horn. A lot of messing in the oven for that one.
I then took a strip of metal that does not have a gauge on it, just says that it is 0.008 of an inch thick. I know that it is finer than 24 gauge. I tried that first and it was too thick and didn't take the design. I marked on the backside of the metal the pattern I wanted to follow. I used a leather stamp in the form of crossed axes and from the backside of the metal made two impressions on either side of the marked pattern. I used a fine pointed leather stylus to mark the indents that look like braille in my pattern between the axe designs. I then turned the metal to the right side and used the same leather stylus to make opposite marks in the pattern between the first set of marks. I then measured and riveted the metal in the size I needed to fit the top rim of the horn. The metal rim was placed on the horn and then with pliers bent it over to the inside of the horn.
 I started with the double axes as the "border" for the pattern.
 Then the backside marks with the stylus in the pattern.
 Second set of marks from the stylus, this time from the front of the metal.
 Finished, on the horn and polished. I am pleased with this little bit of metal work. I may have to do something like this again.
 I used a purchased decorative metal filagree tip and using epoxy glue affixed it to the horn tip.
I will have to make one for me now. Especially now that I know what to do. :)
Drinking horns have been in use from medieval times to modern times. Some horns have bases that are very elaborate, some very simple, that the horn may sit in and not spill. I admit that I have some deer antlers that my intention was to make into a simple drinking horn holder, but I ran out of time. It will be made, just not tonight.
Most horns have a strap or handle that can be looped on a belt so the owner does not lose their horn. The loop or handle does much for keeping the owner in possession of the horn, but there is still the problem of spillage when the horn has liquid in it and a pointy bottom. However, I have been told by several modern day Vikings that a honest to goodness true Viking would never set down his horn with any beverage still in it. :) I am leaving the strap off of my drinking horn for now so I can leave open the option of completing the horn holder I mentioned before and I will see what kind of handle I want to do then.
The carving of the horns can be very breath taking and awe inspiring or they can be very simple and just state "my horn, back off". Here are some examples of what can be done with a drinking horn, some imagination and quite a bit of time.


And some of the more simple designs of horns.


The first thing I did was to carve three of the faces and leaves from the Mammen Man tunic down the long curve of the horn. I carved the faces and leaves using an awl and then a medium weight file to take off the rough spots and smooth everything out. Look at the faces when you get a chance. The whorl of the black and gray make it look like it has a mouth and it howling. Rather neat looking I think.

I used bees' wax to waterproof and finish the inside of the horn. A lot of messing in the oven for that one.
I then took a strip of metal that does not have a gauge on it, just says that it is 0.008 of an inch thick. I know that it is finer than 24 gauge. I tried that first and it was too thick and didn't take the design. I marked on the backside of the metal the pattern I wanted to follow. I used a leather stamp in the form of crossed axes and from the backside of the metal made two impressions on either side of the marked pattern. I used a fine pointed leather stylus to mark the indents that look like braille in my pattern between the axe designs. I then turned the metal to the right side and used the same leather stylus to make opposite marks in the pattern between the first set of marks. I then measured and riveted the metal in the size I needed to fit the top rim of the horn. The metal rim was placed on the horn and then with pliers bent it over to the inside of the horn.


I will have to make one for me now. Especially now that I know what to do. :)
Pewter brooch
Last night when I was working with Mistress Bengta and creating my (still perma-smile over this) glass beads, we had some down time while the beads were cooling. She asked me if I had ever worked with pewter or casting? Nope. Wanna try it? Sure. When I got home last night (much later than anticipated) I came bearing gifts to my husband of pewter with the beads.
In the article "Pewter Casting in Stone Molds" written by Darrel Markewitz in 2000, I learned much about the history of casting. He states; "If gold was the material of high kings, sliver for the wealthy, and bronze for the 'middle class' - it remained for pewter to fill the need for the simplest of ornaments. Pewter, an alloy of lead and tin, mimics the appearance of silver - at least when freshly cast. Not a large number of pewter artifacts remain from the Viking Age, if for no other reason that the material will quickly oxidize and decompose. What samples that have been uncovered are of the simplest workmanship." This tells me that a simple pattern in the cast would have been normal in this time. Pewter was very common, easy to work with and to obtain. Darrel goes on to state in his article; "More clues to the use of pewter by the Norse can be seen the uncovering of many moulds suitable for producing objects cast in this material. Pewter has a relatively low melting point, in the range of 750 F, which is easily attained in a small fire with no special equipment or fire modifications. With a high lead content, the molten metal is fairly fluid, allowing for the use of open topped moulds, such as the antler sample found at Hedeby for a simple disk broach. More complex shapes can be produced through the use of carved stone moulds, such as the dragon mount mould found at Birka. In this case the carved block of soft slate or soapstone would be used in conjunction with a flat backing plate and poured from the edge." The only real limitation I see according to this article would be the time available to you to make your molds. As I found out, making of the mold is very time consuming.
I began by deciding what I wanted to make. The red over tunic that was made for this competition has a wide keyhole. I decided to make a small brooch, simple in design, that would be big enough to attach to the corners of the keyhole without pulling it in and making it pucker. It needed to be simple because there is embroidery and an amber pendant already in that area--I really did not want an over kill. I opted to create a circular brooch, wider at the bottom by the opening, that has a design made from the carving. I did not clear out and make smooth the entire area that would be the pewter--I left three triangles on each side that did not get carved. It made it so I have three triangular "holes" on each side. I like the effect.
I used Bengta's tools and dug and dug and dug some more to carefully make the mold in the stone. It carved out easier than I was expecting. It was very time consuming--two and one half hours for this simple design and my finger is still numb. When the pattern is carved out and smooth and how you want it, you then make the funnel or channel for the pewter to pour into your mold. I placed it opposite the opening on my mold, on the bottom of this picture.

We then went and poured the mold and turned it into a brooch. I discovered that the pewter cools much quicker than I expected and one needs to allow the hot liquid to pour fast or you only get half of a mold filled before the pewter is done. That one simply went back into the pot to remelt and try again. Success.
 I am quite pleased with my first attempt at playing with pewter. I can see that I need more practice making the smooth areas smooth, but not too shabby. This will look very nice against the red linen of his tunic. I do believe I will be doing more of this. It was rather satisfying to start with a stone and a knife and end up a few hours later with a servicable pewter brooch.
In the article "Pewter Casting in Stone Molds" written by Darrel Markewitz in 2000, I learned much about the history of casting. He states; "If gold was the material of high kings, sliver for the wealthy, and bronze for the 'middle class' - it remained for pewter to fill the need for the simplest of ornaments. Pewter, an alloy of lead and tin, mimics the appearance of silver - at least when freshly cast. Not a large number of pewter artifacts remain from the Viking Age, if for no other reason that the material will quickly oxidize and decompose. What samples that have been uncovered are of the simplest workmanship." This tells me that a simple pattern in the cast would have been normal in this time. Pewter was very common, easy to work with and to obtain. Darrel goes on to state in his article; "More clues to the use of pewter by the Norse can be seen the uncovering of many moulds suitable for producing objects cast in this material. Pewter has a relatively low melting point, in the range of 750 F, which is easily attained in a small fire with no special equipment or fire modifications. With a high lead content, the molten metal is fairly fluid, allowing for the use of open topped moulds, such as the antler sample found at Hedeby for a simple disk broach. More complex shapes can be produced through the use of carved stone moulds, such as the dragon mount mould found at Birka. In this case the carved block of soft slate or soapstone would be used in conjunction with a flat backing plate and poured from the edge." The only real limitation I see according to this article would be the time available to you to make your molds. As I found out, making of the mold is very time consuming.
I began by deciding what I wanted to make. The red over tunic that was made for this competition has a wide keyhole. I decided to make a small brooch, simple in design, that would be big enough to attach to the corners of the keyhole without pulling it in and making it pucker. It needed to be simple because there is embroidery and an amber pendant already in that area--I really did not want an over kill. I opted to create a circular brooch, wider at the bottom by the opening, that has a design made from the carving. I did not clear out and make smooth the entire area that would be the pewter--I left three triangles on each side that did not get carved. It made it so I have three triangular "holes" on each side. I like the effect.
I used Bengta's tools and dug and dug and dug some more to carefully make the mold in the stone. It carved out easier than I was expecting. It was very time consuming--two and one half hours for this simple design and my finger is still numb. When the pattern is carved out and smooth and how you want it, you then make the funnel or channel for the pewter to pour into your mold. I placed it opposite the opening on my mold, on the bottom of this picture.

We then went and poured the mold and turned it into a brooch. I discovered that the pewter cools much quicker than I expected and one needs to allow the hot liquid to pour fast or you only get half of a mold filled before the pewter is done. That one simply went back into the pot to remelt and try again. Success.

Viking leather pouch
I was led to this article written by Sighni Ivarsdotter at the website northernneedle.net that discusses a leather Viking pouch found in the Hedeby finds. The article is titled "Embroidered Viking Pouch" and is found at northernneedle.net under the link with the same name. She has an amazing collection of embroidery ideas for this pouch if made in cloth.
The origional pouch was made in a poor quality leather so she made hers in felted wool. I liked the idea of a leather pouch so I went back to the original idea and did it that way. However, I choose to use a higher quality of leather to make it nicer, prettier and more fitting of a Nobleman.
I worked this pouch using white deer skin from Padruigs' leather stash. It has a finish on the leather, so I was not able to do a painted/stain design as was my original plan. It is a very soft and supple leather that is very pleasing to look at. Even plain it still is nice as well as being a functional and useful item for any man to have on his belt.
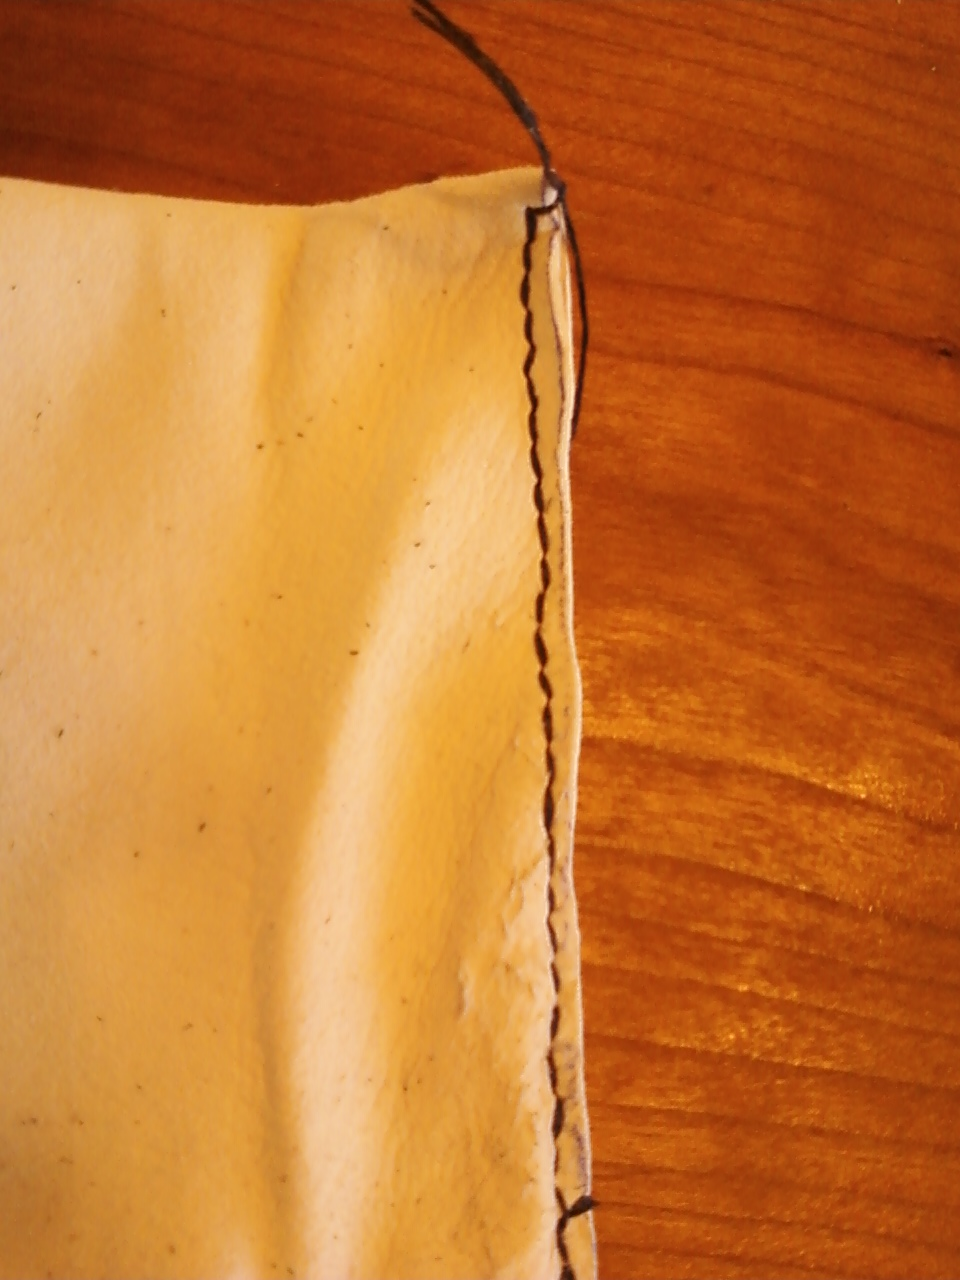
 The inside view of the stitching. I used a stitch that in these modern times are called a saddle stitch. It is a very secure and sturdy stitch worked by using two needles basically doing a running stitch from both sides, crossing in the same hole, at the same time. Sounds complicated, but it isn't really. I can show you at the event since I need to use my hands and the blog makes that difficult.


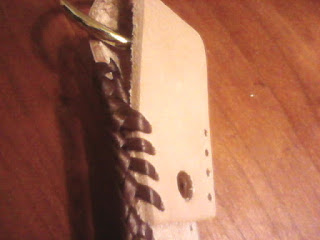
The lacing along the top of the pouch, used to close the bag. I used a chocolate brown leather lace as my drawstring.
 A more distant view of the pouch. I left the strings long enough to not only secure the pouch closed but to also be able to tie it to Padruig's belt.
 The finished Viking leather pouch. The next one I make will be bigger since when I showed Padruig, his first words were, "I have a new dice bag!"
The origional pouch was made in a poor quality leather so she made hers in felted wool. I liked the idea of a leather pouch so I went back to the original idea and did it that way. However, I choose to use a higher quality of leather to make it nicer, prettier and more fitting of a Nobleman.
I worked this pouch using white deer skin from Padruigs' leather stash. It has a finish on the leather, so I was not able to do a painted/stain design as was my original plan. It is a very soft and supple leather that is very pleasing to look at. Even plain it still is nice as well as being a functional and useful item for any man to have on his belt.
 The inside view of the stitching. I used a stitch that in these modern times are called a saddle stitch. It is a very secure and sturdy stitch worked by using two needles basically doing a running stitch from both sides, crossing in the same hole, at the same time. Sounds complicated, but it isn't really. I can show you at the event since I need to use my hands and the blog makes that difficult.
Up close view of the same seam.

The lacing along the top of the pouch, used to close the bag. I used a chocolate brown leather lace as my drawstring.
 A more distant view of the pouch. I left the strings long enough to not only secure the pouch closed but to also be able to tie it to Padruig's belt.
Amber and glass bead necklace
Amber is a stone that has been revered and desired throughout history. It has been thought to have healing properties, promoting health and wellness as well as being considered valuable enough for trading purposes in the Viking Era.
In the book "The Great Book of Amber" by Elbieta Mierzwinska this quote is found; "Thousands of years ago people were fascinated by the extraordinary, inexplicable properties of the golden pebbles found on beaches and in coastal forests. The stone burnt when cast into the fire, exuding a pleasant resinous smell and aromatic smoke, and, when rubbed, attracted various small light items towards itself as if by magic.
The stone interior would often hide small undamaged plants and insects, which must also have found their way inside by magic. That sufficed to arouse the curiosity of primitive man, with admiration & respect for this unusual gem. It is no wonder man started attributing magical powers to amber."
I wanted to make an amber necklace as an accent for this outfit. I was gifted two somewhat large, smooth pieces of amber a few months ago that I chose from. I wanted something nice and flattering, but not "girly" and not too flashy. I found these pictures of amber necklaces online and decided to do a combination of the two.
In the book "The Great Book of Amber" by Elbieta Mierzwinska this quote is found; "Thousands of years ago people were fascinated by the extraordinary, inexplicable properties of the golden pebbles found on beaches and in coastal forests. The stone burnt when cast into the fire, exuding a pleasant resinous smell and aromatic smoke, and, when rubbed, attracted various small light items towards itself as if by magic.
The stone interior would often hide small undamaged plants and insects, which must also have found their way inside by magic. That sufficed to arouse the curiosity of primitive man, with admiration & respect for this unusual gem. It is no wonder man started attributing magical powers to amber."
 |
| A variation of metal wire wrapping to secure the stone. |
 |
| Another style of metal wire wrapping to secure stones for pendants.  The front of the amber pendant, wrapped with silver plated wire. I worked the wire netting first, then wove the side to side. I did this for two reasons: I liked the woven look on the other pendant, and second; the stone felt slightly loose with just the netting and I did not want to risk an accidental loss of the stone. This is my first attempt at jewelry making. The front of the amber pendant, wrapped with silver plated wire. I worked the wire netting first, then wove the side to side. I did this for two reasons: I liked the woven look on the other pendant, and second; the stone felt slightly loose with just the netting and I did not want to risk an accidental loss of the stone. This is my first attempt at jewelry making. netting. Then it was proposed to me to try my hand at making glass beads. Hmmm. Another new skill as a direct result of this contest. Sure. Why not. With the guidance and instruction from Mistress Bengta, I was able to use her equipment and make myself some beads for a spash of color on the pendant. In true Viking fashion, they are blue, green, torquoise, orange and red. From the website of awesomeness vikinganswerlady.com I was able to learn much regarding glass beads, what is period and other fascinating information. On her webpage she writes this about the value of the beads: "A tenth century Arab once said that the Vikings would "go to any length to get hold of colored beads" (Wernick, 94). Certainly colored beads of flameworked glass from Birka; native amber and jet; carnelian and silver imported from India and Iran via Islamic and Rus traders; rock crystal; garnet; amethyst; gold, and bronze and many other types of beads were highly prized by the Scandinavians." This tells me that glass beads and amber combined were prized and valuable, and worthy to be worn by a Nobleman. I tried to make two different styles of patterning on the beads; eye beads and ones with, for lack of a better discription, squiggly lines across the width of the bead. The eye beads were supposed to have raised bumps on the surface of the bead that were made with contrasting colors that resemble eyeballs, hence the name. These were an epic fail for that effect, however, I like my mistakes. My first one has the colors blended together so well that it appears to be a blue bead with irredescent green swirls. My second try had me rush it too fast and I pulled some of the clay from the mandral (metal stick used to hold bead in the flame) and it mixed with the melting glass. So inbedded with the turquoise base and reddish dots are bits of clay. I still like my bead. My third, fourth and fifth beads were done in the swirly line pattern. My third attempt is my favorite-blue base with orange swirl. My fourth bead broke when I tried to cool it too quickly. My fifth and last bead is dark green base and light blue swirls.  The irredesent blue and green "mistake". And in true Viking fashion, I am keeping it!    And the finished Ta-Daah pendant. It is strung on a Viking weave gold plated chain that Padruig made a couple years ago. I will be making another one in silver to match the metal wire netting, but simply ran out of time for this competition. |
Ax Sheath
 |
| Simple sheath that only protects the edge of the blade. |
 |
| Simple sheath that ties on and only protects the edge. |
 |
| The cut leather. It is shaped to cover the entire head of the axe and wrap around the handle. This will ensure protection of the engravings. It was measured to be 1/2 inch larger than the axe edges so it can slip off and on easily. |
The wax transfer. I found this pattern in the "Great Book of Celtic Patterns" by Lora S Irish. It is titled Viking Wolf and is on page 129.   Next, the holes for the lacing was made. I think I really love this nifty tool. Simply line up where you want your next four holes and pound them through. Next, the holes for the lacing was made. I think I really love this nifty tool. Simply line up where you want your next four holes and pound them through.  The lacing process. This particular lacing method, called Double Loop lacing, is not a period method. Padruig really likes this style and effect--it completely covers the edge, giving it additional strength and durability and it looks really neat and tidy. It was worked using a flat leather lacing needle with a special eye that grips the lacing with teeth. You can sort of see it in this picture. I have never done any lacing like this and I am very pleased with the outcome. The lacing process. This particular lacing method, called Double Loop lacing, is not a period method. Padruig really likes this style and effect--it completely covers the edge, giving it additional strength and durability and it looks really neat and tidy. It was worked using a flat leather lacing needle with a special eye that grips the lacing with teeth. You can sort of see it in this picture. I have never done any lacing like this and I am very pleased with the outcome. Up close view of the Double Loop lacing method. I really like the braided look. Up close view of the Double Loop lacing method. I really like the braided look. The finished axe sheath. It completely covers all that I wanted to protect and doesn't have a single tie or strap. I am rather pleased with it. The finished axe sheath. It completely covers all that I wanted to protect and doesn't have a single tie or strap. I am rather pleased with it. |
Friday, December 30, 2011
Cloak
 |
| The outer layer of the cloak is 100% brown wool and the lining in 100% natural linen. The cloak is sewn by hand with the over sew technique.The motifs were worked in the same colors as the tunic--gold, pale orange, white and royal blue. The faces are a varient of what can be found on the Mammen Man Museum replica. |
 |
| This is the style of motif found on the museum replica. I worked it as is first and did not like it. I found it too busy and cluttered. I took out the small Squidward faces and realigned the hand/vines and worked the cloak with those. There are ten motifs on my cloak, five per front panel. |
 |
| I worked the faces in the blue using the stem stitch that is favored on this project. |
 |
| The hands/vines I worked in the chain stitch. I wanted different texures than was on the faces. I outlined them in the stem stitch. I love how the hands look like the joints of fingers. |
 |
| The rabbit fur collar. This was my first attempt as working with rabbit fur. I like it more than the goat fur, but am not a fan of working with either. I love the warm and fuzzy effect though. |
 |
| I shaped some deer antler tips to use as the two toggles that close the cloak. This was my first attempt at working with deer antlers. I really like the finishing touch it gives the cloak. The Mammen Man cloak uses an elaborate weave of silk to close the neck. This would be another variation I added for personal taste. |
 |
| Another view of the rabbit fur neckline. |
 |
| I used the over sew technique for the cloak as well. Here is a shot of the lining lining. |
 |
| I am very pleased with the finished look and comfort of the cloak. Warm enough, but not overly so, and very nice looking. |
Subscribe to:
Posts (Atom)